

JERKY BASICS
| Jerky Basics | The Jerky Primer | Solar Ovens |
There are many methods for making jerky. In the past, the simplest - but hardly the safest - was to cut the meat into strips and hang them in the sun.
Oceanside North American Indian tribes improved on this by soaking the strips in seawater before drying them. That idea is still used by those who soak the strips in brine before drying.
Another Indian method was to hang the strips over a slow-burning fire of hardwood, or even an aromatic wood. The strips weren't near enough to the fire to cook, but were near enough to hasten drying and to keep off flies.
Another step forward was taken when pepper was pounded into the meat, adding flavor. The next step was a logical one - to soak the meat in a marinade. We find this the best way to produce a jerky that is tasty as well as nourishing.
Don't consider jerky an all-purpose food. It is, of course, high in protein, but it lacks both fat and vitamin C. It's fine for a few meals on the trail, since it can be eaten cold, requiring vigorous chewing, or it can be the basis for many a recipe for stew.
Delicious, nourishing jerky can be made inexpensively of strips of almost any lean meat marinated in soy or Worcestershire sauce, brushed with liquid smoke, or sprinkled with garlic powder or seasoned salt. There are many ways to add flavor to jerky.
No matter how well you make jerky, consider its shelf life short. Keep it in plastic bags or glass jars, so it will not absorb moisture, and store the containers in the refrigerator or freezer for maximum safe storage. Eat the jerky within 6 months.
THE JERKY PRIMER
compiled by Steve Tobin
Jerky is meat cut into thin strips and dried to preserve it for future use. It is probably one of the most ancient methods of food preservation known. The meat can be flavored or treated during the drying process to improve flavor or nutritional content. The American Indians made pemmican out of dried venison or buffalo meat, mixed with dried berries and buffalo fat. This was packed and sealed into leather bags where it would keep for months without spoiling.
The most popular use for jerky today is as a high protein snack, and as a source of meat on outings where fresh meat is not available, or where weight is a factor. Meat looses about 1/4 to 1/3 of it's weight when it is dried. Jerky may also be rehydrated and used for cooking.
Meat Selection and Processing
Meat Jerky may be made from beef, venison, moose, elk, antelope and other game animals. The fat in meat goes rancid and will spoil the jerky fast. When using beef, use only the leaner cuts such as the round and chuck roast. Wild game animals are typically very lean, so this is less of a problem. Trim off all of the fat and membrane that you can as you cut up the meat. When making jerky cleanliness and sanitation are of utmost importance. Be sure all work surfaces, equipment and hands are thoroughly clean.
Cut the meat into thin strips across the grain of the meat. The thinner the strips are, the quicker it will dry. 1/4" thick and 6" long is about right. You will be able to cut the meat into slices easier if it is partially frozen. Freeze, or thaw, the meat until the meat is just barely pliable and still cutable.
Once you have the meat cut into strips the next step is to dry it. There are several methods you may use.
∙ Method 1: Lay out the strips on a cookie sheet lined with foil, turned up at the edges so juice won't get over everything. Lay out meat in rows and a single layer. This is easiest, but the pieces in the middle will dry slower than the edge pieces. You also need to turn the pieces over at the end and dry a while longer to ensure the bottoms get dry.
∙ Method 2: This preferred method is to lay the meat slices on a grill or grate that allows air to reach both sides and to flow around each piece. The meat will drip, especially if marinated, so you need to place a tray or aluminum foil under the meat to catch the drips. Space it as far underneath the meat as possible to avoid restricting the air flow.
∙ Method 3: The best solution is to use a dehydrator with a built-in electric heater and fan. This allows fast, even drying with little risk of food spoilage, and may be used to dry a wide variety of foods for camp and trail use. Look for a unit with a fan and a thermostat for best results.
Lay the slices out in rows and in a single layer. Do not allow the pieces to touch. Sprinkle with coarse ground black pepper and salt, garlic powder or spices that you like the taste of.
Do not place racks so that one layer can drip on another layer. If you are using the oven, set it to WARM (120-170 deg. F.), and leave in the oven overnight, or 8-10 hrs. This ensures slow and complete drying.
To test for proper dryness bend the pieces. They should bend just slightly before they break.
Store in a cool, dry area in a sealed plastic container, jar, or can after well cooled. Too much moisture left in the meat will cause mold, and putting it away while warm will cause sweating inside the container.
From Tom Brown's Field Guide to Wilderness Survival:
Drying: The simplest and most universal method of preserving meats and fruits is by drying them either by the fire or in the direct rays of the sun. Small fruits such as berries can be dried whole on flat rocks, while larger fruits should be sliced thin first. Vegetables should be eaten fresh whenever possible - or stored in a cool, dry place until needed.
Minnows and very small fish can be dried whole, although it is safest to clean them first. They can then be pounded with a hammerstone to crush the bones. The easiest drying procedure for larger fish is to crack them down the backbone and hang them up to dry, bones and all. The bones can either be pounded and pulverized or taken out later to mix with soups and stews. (Whatever you do, don't throw them away!) You can also fillet larger fish by slicing the meat off both sides of the backbone, then hanging the steaks up to dry. Use the skin, head, and tail for soups and stews.
Most birds and small mammals such as mice and ground squirrels can be dried by cracking open the rib cage and pelvic girdle and laying them flat on a rock. The rock can be propped up to receive more direct heat, but if you leave it by the fire, keep the meat far enough away so it dries without cooking. When it's dry on one side, flip the animal and dry it on the other. Finally, pound the entire animal with a rock to pulverize the bones; then dry it once more. This mash-and-dried-meat-and-bone combination can then be stored or added to soups and stews. The cooking process will soften the small bone fragments into edible tidbits.
Jerky: Larger animals should first be butchered into manageable chunks. After you have taken what roasts and steaks you can immediately use and removed all the fat (which turns rancid quickly unless rendered) cut the rest into long, thin strips along the length of the muscle. An ideal strip is an eighth-inch to a quarter-inch thick, about an inch wide, and as long as the meat suggests. The thinner the meat, the faster and more effective the drying process. Cut longer strips by splicing in spirals from the edge to the center of the meat. Then hang these strips on poles to dry. (A sturdy tripod lashed with horizontal poles makes a good meat dryer.)
The test for dryness is that the meat will crack or snap when you bend it. If it bends without cracking, it's still too wet. If it crumbles in your hands, it's probably a little too dry. Try to get the meat to just the right point, as dampness will bring on spoilage and overdrying will burn off some of the nutrients. After they are thoroughly dry, these strips of "jerky," as they are called, can be moistened and eaten as snacks or rolled up and stored indefinitely for later use in soups and stews.
Pemmican: The Indians, mountain men, and pioneers of old used to mix equal portions of jerky, partially dried and pounded berries, and rendered animal fat to make a long-lasting and highly nutritious food called pemmican. Pemmican could be kept for such long periods that it became a standby meal on trips lasting up to several months.
The key ingredient in pemmican is the animal fat. It is heated until it becomes liquid and then filtered twice through dried grasses to yield a pure tallow. When the tallow cools, it hardens just like bacon grease. Mix this in with equal amounts of jerky and dried, crushed berries; then store the mix inside a cleaned, airtight container.
SOLAR OVENS
The "Minimum" Solar Box
Cooker
This is a great site! Has all kinds of plans for cooking w/the sun! Don't know if you want to put the following document I copied from their site or just put in the link? I only copied one of the plans for Solar Ovens. They have about 5-7 that I glanced through.
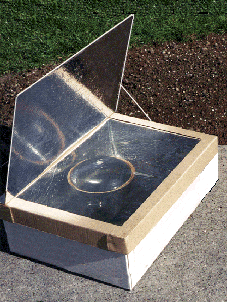
A great solar oven you can build quickly from two cardboard boxes

Experiments in Seattle and Arizona have proven that solar box cookers can be built more simply than even the simple method we have been using. These discoveries have paved the way for a simpler construction method that allows a cooker to be built in a few hours for very little money.
The following developments make this design possible:
A New Simpler Design
Taking these factors into account, we are able to take our best shot at describing the minimum solar box cooker -- one that can be built by anyone with access to cardboard, foil, glue, and plastic or glass.
What You Will Need
Almost any size will work. The proportion between the two boxes is not critical. We would suggest that you use an inner box that is at least 15" x 15" (38cm x 38cm), but bigger is better. The outer box should be larger all around, but it doesn't matter how much bigger, as long as there is a half inch (1.5cm) or more of an airspace between the two boxes. Also note that the distance between the two boxes does not have to be equal all the way around.
This piece must be approximately 3" (7.5cm) larger all the way around than the top of the finished cooker.
These are available in almost all supermarkets in the U.S. and they can be mail ordered from Solar Cookers International. They are rated for 400° F (204.4° C) so they are perfect for solar cooking. They are not UV resistant; thus they will become more brittle and opaque over time and may need to be replaced periodically.
Building the Base
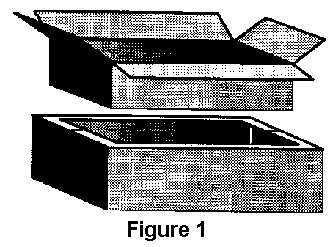
Fold the top flaps closed on the outer box and set the inner box on top and trace a line around it onto the top of the outer box, Remove the inner box and cut along this line to form a hole in the top of the outer box (Figure 1).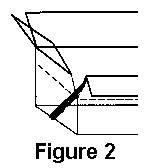
Decide how deep you want your oven to be (about 1" or 2.5cm bigger than your largest pot and at least 1" shorter than the outer box) and slit the corners of the inner box down to that height. Fold each side down forming extended flaps (Figure 2). Folding is smoother if you first draw a firm line from the end of one cut to the other where the folds are to go.
Glue foil to the inside of both boxes and also to the inside of the remaining top flaps of the outer box. Don't waste your time being neat on the outer box, since it will never be seen, nor will it experience any wear. The inner box will be visible even after assembly, so if it matters to you, you might want to take more time here. Glue the top flaps closed on the outer box.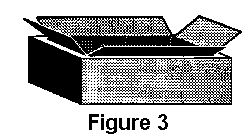
Place some wads of crumpled newspaper into the outer box so that when you set the inner box down inside the hole in the outer box, the flaps on the inner box just touch the top of the outer box (Figure 3). Glue these flaps onto the top of the outer box. Trim the excess flap length to be even with the perimeter of the outer box. The base is now finished.
Building the Removable Lid
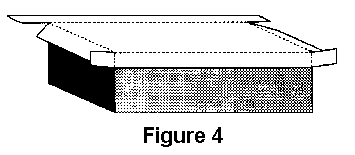
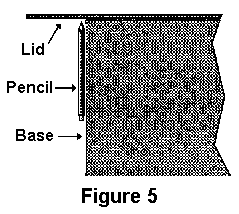
Take the large sheet of cardboard and lay it on top of the base. Trace its outline and then cut and fold down the edges to form a lip of about 3" (7.5cm). Fold the corner flaps around and glue to the side lid flaps. (Figure 4). Orient the corrugations so that they go from left to right as you face the oven so that later the prop may be inserted into the corrugations (Figure 6). One trick you can use to make the lid fit well is to lay the pencil or pen against the side of the box when marking (Figure 5). 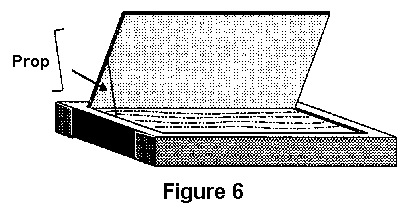
To make the reflector flap, draw a line on the lid, forming a rectangle the same size as the oven opening. Cut around three sides and fold the resulting flap up forming the reflector (Figure 6). Foil this flap on the inside.
To make a prop bend a 12" (30cm) piece of hanger wire as indicated in Figure 6. This can then be inserted into the corrugations as shown.
Next, turn the lid upside-down and glue the oven bag (or other glazing material) in place. We have had great success using the turkey size oven bag (19" x 23 1/2", 47.5cm x 58.5cm) applied as is, i.e., without opening it up. This makes a double layer of plastic. The two layers tend to separate from each other to form an airspace as the oven cooks. When using this method, it is important to also glue the bag closed on its open end. This stops water vapor from entering the bag and condensing. Alternately you can cut any size oven bag open to form a flat sheet large enough to cover the oven opening.
Finally, to make the drip pan, cut a piece of cardboard, the same size as the bottom of the interior of the oven and apply foil to one side. Paint this foiled side black and allow it to dry. Put this in the oven (black side up) and place your pots on it when cooking.
 |
Improving Efficiency
For more information contact: |
Solar Cookers International
1919 21st Street, #101
Sacramento, California 95814
sci@igc.apc.org