
BUILDING A POSITIVE DISPLACEMENT PUMP
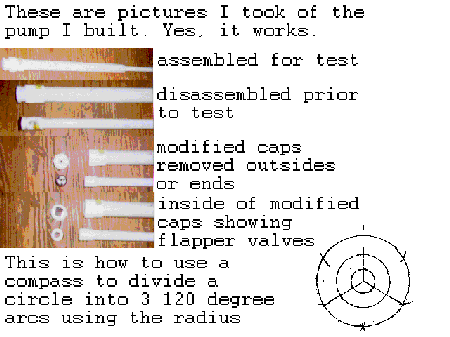
Read the entire article before attempting this. There are pictures at the bottom that I will refer to in the article of how to segment a circle so that you can make your own drilling guide for the pieces. There are also pictures of the actual positive displacement pump I built. I even included an animated GIF that is still loading while you read this article. If anybody has a problem with any of this, e-mail me at IronWyng@aol.com. Put Pump in the subject title so I don't delete - I hate the porno spammers.
Remember that anything you do in an aquifer affects everybody in the area. You have a moral responsibility to never contaminate an aquifer under any circumstances whatsoever. You and others will be needing that water later. What you put down there will affect more people than you can ever imagine and for a very long time.
This pump will, when in good shape, bring water up from a pretty good depth. The standard pitcher pump will only bring water up from depths of about twenty-five feet. If one tries to bring water up from much deeper using a vacuum it will decompress and no longer be liquid. That is why a deep well positive displacement pump is required for the job quite often. This is an expedient way to do it and it can be set up quit a bit more permanently using the general guidelines for the above ground apparatus described at this site (https://www.lifewater.ca/ ) for the bush pump. The difference is that we will not have steel guide rods inside a PVC tube. We will be using the piston made from 3/4" schedule 40 tubing as the rod and the piston. It is very much suggested for your own health to read the instructions at that web site for maintaining a well in proper condition. You will also find instructions there for even drilling a well the old fashioned way.
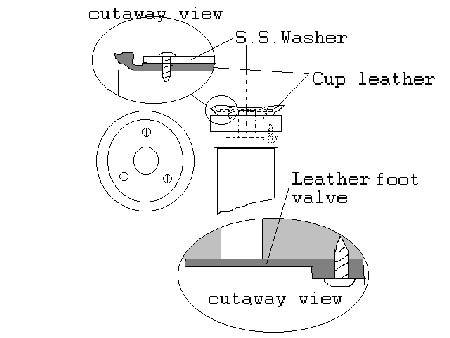
The main pipe or well casing for my well is just big enough to fit a 1 and 1/4" piece of schedule 40 tubing with a female threaded coupling on the end. That was the point I had to start from. I wanted to be able to pump as much per stroke as I could, so I went with the biggest diameters I possibly could. There are two valves in this system and they are both simple flapper valves made out of leather soaked in wax. I left the valves thick where they were screwed into the end caps but thinned them down for flexibility so they would actually move. They didn't work at all the first try as they were too thick.
There is also a cup on the end of the 3/4" schedule 40 tubing that seals the water in and forces it into the end of the 3/4" tubing valve rather than allow it to simply bypass it. The seals aren't perfect but they work quite well. They are also replaceable by you on top of it all. You may find that you have to file away a bit of the PVC caps in order for them to fit inside the various pieces you will be using. I had to do more than a little bit of that myself.
Before you even get started make sure that the pipe sizes I am giving you here will work for you. Also make sure when you build this that you use the correct adhesives. Once it falls in the well, you have serious problems. Well drilling is not very easy either. Think everything through before you act. If you don't, you will probably regret it. When assembling the whole thing, put the wide or coupling end up. Sometimes if you drop it you can pick it up with another piece dropped into the fitting with glue on the end. The schedule 40 pipe can take quite a bit of tension when properly glued and it is going to be both the cylinder from top to the bottom and the same is true for the 3/4" rod and delivery tube.
What you will need to build this pump:
Materials
Humility
After ensuring that everything will fit, drill holes in the end caps one in the 1 and 1/4 and one in the 3/4 inch caps put the holes in about the center. Don't make the holes much larger than 3/8". It is a real good idea to leave something for the flapper valves to seat against. After you drill, clean up the holes so there is no loose debris that will come loose later and stop the valve from sealing.
Next drill three holes in the washer for the three 8x3/8 screws to pass through. The holes should be 120 degrees apart. You can use the instructions I provided that most of us forgot a long time ago for dividing a circle into six parts using a compass. You will find that picture already loaded unless you are on my computer. When you make a circle with a compass the radius can be used to scribe the circle in sixty degree sections. By using this method you can create 3 holes almost exactly 120 degrees apart in the washer.
Using the compass, create a circle about 2" in diameter on the leather. Then make a circle inside of the big one that is about the same diameter as the one you made in the 3/4" cap.
Center the leather piece with the smooth side against the cap over the hole. Place the washer on the leather laying on the cap and drill three holes for the screws through the leather and into the cap. Try not to drill through the cap, just into it enough to get the screws started.
Now screw the three screws into the cap through the washer and leather to hold the leather in place on the cap with the washer.
Next you install the two foot valves on the inside of the two end caps. Make sure you have thinned the part of the leather that will be sealing and moving down a bit. I thinned mine to about 1/16". Once you impregnate the leather with wax it does get a little stiff.
Take about three feet of the 1 and 1/4" tubing, cut it off, and install one of the female threaded fittings on it. Then do the same thing on about a four foot piece of the 3/4" tubing using of course the 3/4" female threaded coupling for it. You will be using these pieces to assemble and test for flexibility before you try to put it to use. (It is much easier that way.)
Cut another piece of the 1 and 1/4" tubing about three feet long and make very sure the cut is very square. You will be using this piece to trim the extra part of the leather from the cup. This will ensure a nice solid fit.
After you have assembled the leather washers and screws, heat up some wax and soak the assemblies in it, until they will soak up no more.
Install the 3/4" end cap onto the threaded tubing while the wax is still liquid and pull the assembly into the end of the 1 and 1/4" tube until it is firmly locked in place. If you pull too hard you will start breaking the washer loose and get to start all over.
With the cup locked in place trim the excess leather away at about a 45 degree angle inward. Then pull it into the tube and then leave it for a few hours to set up.
After the wax is thoroughly hardened you are ready to test the pump. Install the 1 and 1/4" cap on the three foot tube you prepared earlier and then install the four foot tube and valve assembly in it. Place the assembly in a clean and I do mean clean, bucket of water and start stroking up and down. If the valves are working correctly it should start pumping water to the top of the tube.
If this worked out well (no pun intended) you can begin installing the assembly in the well. The only difference being that the tubes are a lot longer. Be sure to hold pieces in place while you are gluing them and placing them in the well so that they don't just fall in. I suggest a pair of padded vice grips for that purpose. Like I said earlier you don't want to drop anything into the well.
You also need to ensure that there is a way to keep the entire assembly from falling in during use as well. I would suggest using steel tubing at the top to hold the 1 and 1/4" piece in place. For a quick job I would also install a T-handle and spigot on the 3/4" piece, until you can get more elaborate. I will add to this file when I get a chance to do so, but I have way too much to do. I have to finish the siding on my house. Then I have to get to work on the inside again. But I know I will finish the full scale pump first. I am so bad!
You also have to be sure that nothing can get into the well and create a biological hazard. Rodents and insects are a major contamination vector. You want to be sure they don't kill you with some nasty diseases. Read up on the sterilization procedures at the link I provided at the top of the page.
Another thing that can be done in a pinch, is to make well buckets using the PVC and the foot valve I have described. But you will work quite a while to get reasonable amounts of water for your use. I will be making a few of them for my neighbors. Attach a string to them and drop them in and extract them after they sink. Make sure once again that no contaminants get into the well and the bucket isn't stupidly left lying on the ground.
P.S. Don't forget that with this design your water source will be moving up and down. As you push down on the pump, what you pulled up, will fall out of the top of the pipe. I would suggest capping it off and installing a flexible tube on it and attaching that in a static position to fill buckets from. You will also notice that the 3/4" tubing can take up to 480 psi. I have seen this stuff take some real big tensile loads without breaking. Water weighs 8 pounds per gallon. Just for the really ridiculous, we will say that the PVC tubing weighs the same as water and it is lighter by the way. Here is how it looks, one gallon will fill 40.74 feet of 3/4" tubing. Let's say the two pieces of tubing weigh eight pounds apiece too. That is twenty four pounds to go forty feet it will be quite a bit lower actually because PVC is quite light. But to bring water up from eighty feet you will only be working against about seventy five pounds. Big deal put a lever on it.


