
MAP READING
By: TKB
Maps are a graphic representation of a portion of the earth's surface, drawn to scale, as seen from above. Various man made and natural features are depicted by symbols, lines, colors and forms. It is not possible to represent every feature true to scale or in its true shape, therefore features are often represented with conventional symbols. Some of these landmarks and features are exaggerated in size beyond the actual ground limits so that we can see them without a magnifying glass.
The purpose of a map is to provide information on the existence and location and landmarks and features and of the distances between various ground features and landmarks. Information found on maps include: populated places, cities, towns, power lines, rail lines, roads and travel routes, variations in terrain, heights of natural features and the extent of vegetation.
Some of the important items you will find on maps include:
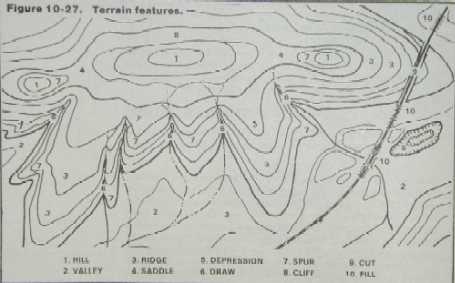
Terrain Features
There are different types of maps:
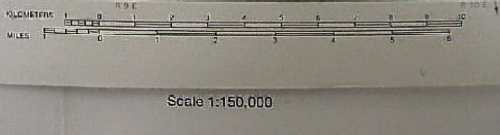
A map is a scaled graphic representation of a portion of the earth's surface. The scale of the map is expressed as a fraction and gives a ratio of map distance to ground distance. It permits the user of the map to convert distance on the map to distance on the ground, this is important for planning any navigation from place to place.
Most maps that you will be using have a scale of 1:250,000 that are a standard medium scale.
How To Find Places By Using Maps To Navigate & Orient
While it is easy to find your current or desired future location in a city using a city map, it is not always the case when you are in an area without named streets with numbered buildings.
A universal and precise systems of referencing locations on maps has been developed in order to find locations in undeveloped areas or areas that are unfamiliar to you. There are several different methods of map referencing but I will only address the ones that civilians use or are likely to encounter.
Referencing using Geographic Coordinates
Geographic coordinates are one of the oldest and most common methods of systematic location referencing. This system uses a set of east - west rings parallel to the equator, called lines of latitude, and a set of north-south rings crossing the equator at a 90° or right angle converging at the poles.
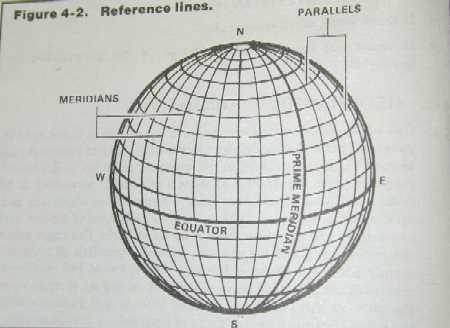
These lines are called Longitude or meridians. One meridian is designated as the Prime Meridian. The Prime Meridian runs through Greenwich, England and is also know as the Greenwich Meridian.
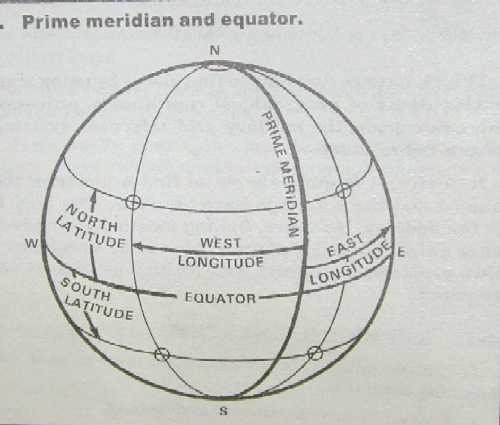
Latitude lines (east-west) and has measured distances between them. Lines of longitude have measured values decreasing to zero as the line travels from the equator toward the poles
Geographic coordinates are expressed in angular measurements. Each circle of latitude and longitude is divided into 360°, each degree into 60 minutes and each minute into 60 seconds. The symbols used for expression is ° for degree, ' for minute, " for second.
Latitude measurement starts at the equator. The equator = zero each line of latitude increases incrementally from that point north and south until a value of 90° at the poles, north and south. Since latitude can have the same value north or south of the equator the direction of latitude must be given. For example here in the northwest, we are located at approximately 47° N latitude, or about half way between the equator and North Pole.
Longitude is measured both east and west from the prime meridian until a value of 180° is reached. The prime meridian = zero. The line directly opposite of the prime meridian (180° east/west) is known as the international dateline or can be referred to as the east-west longitude. (Note: As you travel east from the 180° longitude mark you move into the next day. As you travel west you move back into the previous day).
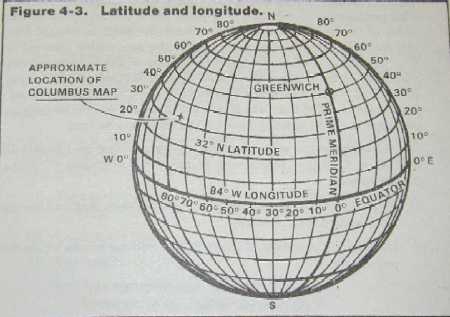
At any point on earth, the ground distance covered by one degree of latitude is equal to 69 miles or about 111 kilometers, one second equal 100 ft or 30 about meters.
One degree of Longitude is equal to 69 miles (111 km) and one second equal 100 ft or about 30 meters at the equator but it decreases at it moves toward to the poles until becomes zero. For example one second of longitude at 39° N (approx. Washington DC) is 74 ft (24 meters).
You will find the Latitude & Longitude coordinate system used in GPS units, on military maps and some atlas's (DeLorme).
When used on maps you will find the four lines that enclose the map are lines of latitude and longitude. Their values are given in degrees, minutes, and seconds at each of the four corners. Sometimes you will see tick marks with a value at regular intervals on the right side of the map. For example 20'about 1/3 of the way up: if the bottom latitude value is 45° 15", then the value at the tick mark would be 45° 20"(45 degrees, 20 min.)
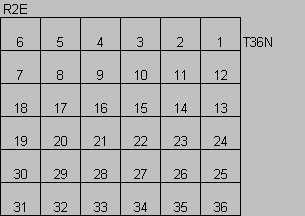
Referencing Using Range & Township Method
This system was originally used to survey undeveloped lands. The land is divided into townships approximately 6 miles square (6 miles X 6 miles). The Townships are labeled numerically running north & south and Ranges are labeled numerically east and west. You will find these numbers on the margins of the map. Each township is divided into 36 numbered sections that are approximately 1 mile square. Each section can be further divided into 1/4 mile squares (4 X 4) and is labeled by the direction of the corner in reference to grid north. This grid can then be further divided into1/8 mile squares and pinpoint a location within about 85 feet.
While this system will not be of much value if you are lost unless you locate a Forest Service bearing marker tree, it is a very good system for addressing or finding locations on a map.
Navigation & Compass Orienteering
Measuring Distance Of Travel And Time Estimation
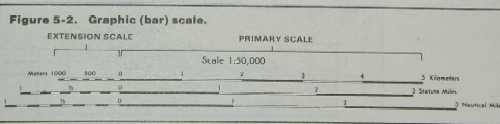
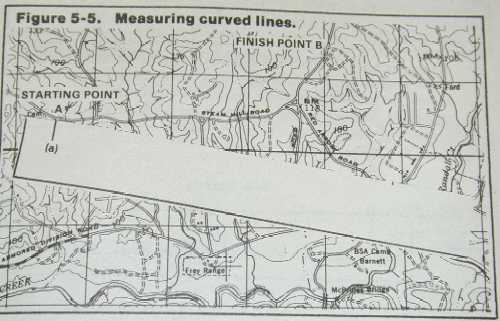
Using your scale on the map you can use a protractor or a piece of paper to figure out the distance that needs to be covered from your starting point to your destination.
Using a piece of paper is easier because you can mark distances and then compare it to the scale to get a distance. The protractor will be able to give you a straight line of travel distance and is good for initial estimating.
We will cover the techniques to use when it is important to have a more accurate idea of the distance and time it will take to get to your destination.
Use Of Map Exercises:
Now find your starting point and determine the route you are intending to take. Are there any obstructions noted that will cause a detour (for example, rivers, lakes, marshland, & mountains may require route deviations)?
Now using another clean edge of paper make a tick mark at the starting point and when your route now makes a turn hold your pencil/pen and pivot the paper so that another straight line is found follow it until another bend is made make another tick mark.
Continue doing this until you have reached your destination. Now take the scale on the map and measure the distance from your first mark to your last tick mark. What is the distance?
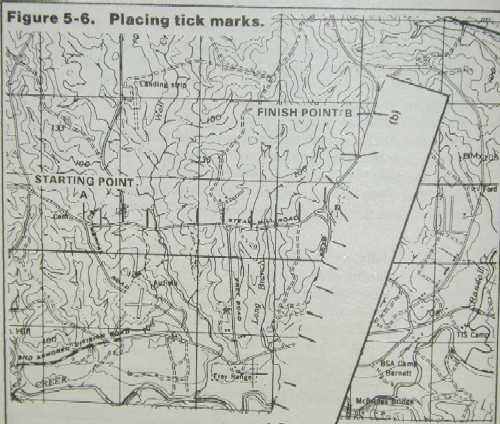
This is the distance you will have to cover. The time it will take will be determined by several factors.
Methods Used To Measure Ground Distance:
Pace Method: a pace is equal to a natural step. To accurately use this method you must know how many paces it takes you to walk 100 meters. This will vary from flat terrain to hills and step slopes.
There are several ways to keep track of your paces.
Pick up pebbles along the way and out them in your pocket for every 100 meters your have traveled.
Tie knots in a string
Use pace beads on a string.
Do not try to remember the count. Always use one of the methods above.
Note:
1 meter = 3.2 ft = 39.37 inches
1 kilometer = .62 mile = 3280.84 feet
As mentioned before your distance on the ground will be different from your measured map distance. So your pace count must be adjusted for the following conditions in the field.
Don't rely on the pedometer gadgets, they do not work.
Land Navigation Equipment and Methods
Compasses have been the primary tools for navigation for moving about in the outdoors when there is no other way to find directions. In today's world there is GPS (global positioning systems) as well. Once you know how the coordinate system works and how to read maps then using the GPS coordinates given by your handheld unit you can locate yourself on the map. I personally see a few problems with using the GPS units solely without general compass use knowledge. First GPS units are great about telling you where you have been and mapping your movements, but unless you already have an idea of the coordinates of where you want to be you still have to figure out how to navigate to the location. Second, when you use up your batteries in your unit you are virtually blind again. Ideally, having both and knowing how to use both would be the way to go.
I am going to cover the use of navigation using a basic compass and briefly discuss some field expedient methods to use when you do not have a compass.
The lensatic compass is the most common and simplest instrument for finding and measuring direction.
The compass consists of three major parts.
The Cover protects the floating dial and contains a sighting wire or front sight and 2 luminous sighting slots or dots used for night navigation.
The Base contains the following moveable parts
The Lens is used to read the dial, and it contains the rear sight used in conjunction with the front for sighting on objects. The rear sight also serves as a lock on clamp to protect the dial when closed. To use you must open the rear sight more than 45° to allow the dial to free float.
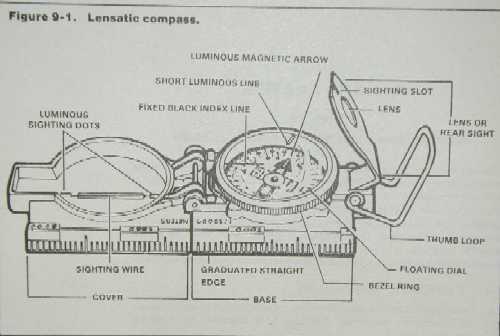
When a compass is in good working condition it is very accurate. Take the time to inspect your compass when you start using it. Check the compass for proper floatation of the dial with the magnetic needle and that the sighting wire is straight. Make sure that there are no broken parts and the numbers are readable and that nothing 'sticks'. Periodically check your compass accuracy using a known line of direction; don't forget to make adjustments for declination if needed. If your compass has broken parts or more than +/- 3° do not use it. You should not have a bubble in the dial. Bubbles are not used to 'level' the compass, they indicate the compass has problems.
Metal objects and electrical sources will affect compass readings. To ensure proper functioning of your compass the following distances from these common objects are suggested as safe.
| Hi Voltage power lines | 55 meters | 180.5 Feet |
| Telephone wires, Barbed wire | 10 meters | 32.8 Feet |
| Rifle | 1/2 meter | 20 Inches |
When traveling with your compass unfolded fold the rear sight fully down onto the bezel ring. This will lock the floating dial and prevent vibration, as well as protect the crystal sight from damage.
Using Your Compass
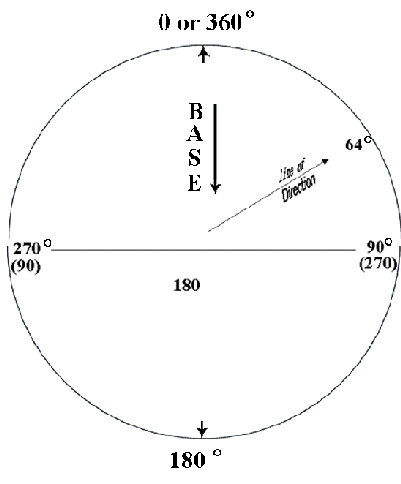
Before you go marching off you must first determine what your azimuth is. An Azimuth is a compass bearing that is a horizontal angle from a fixed location or reference direction to a position or object. The azimuth is measured clockwise from the north baseline. The north baseline could be magnetic north, grid north or true north.
An azimuth expresses direction using an imaginary circle that is divided into 360°
To use your compass open it to it's fullest so that the cover forms a straight edge with the base. Move the rear sight to the rearmost position and allow the dial to float freely.
To use the Centerhold technique pace your thumb through the thumb loop and form a steady base with your 3rd & 4th fingers. Extend your index finger along the remaining side of the compass.
Place the thumb and index finger of the other hand between the rear sight and the bezel ring, extend the remaining fingers around the fingers of the other hand.
Pull your elbows into our sides, placing the compass between your chin & belt.
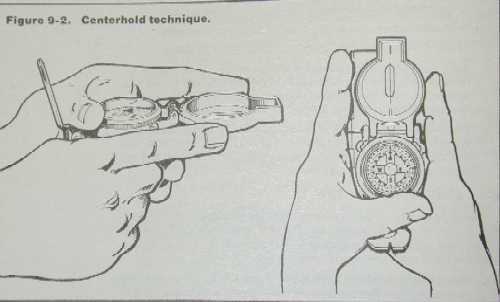
To measure an azimuth, simply turn your entire body toward the object you want to go to. Point the compass cover directly at the object, then look down and read the azimuth from beneath the fixed black index line.
The advantages of using the centerhold technique over the sighting technique are:
To use the Compass to Cheek method fold the compass cover with the sighting wire in the vertical position and fold the rear sight slightly forward. Put the thumb into the thumbhold or between the thumbhold and rear sight which ever is more comfortable and offers a steady level hold of the compass.
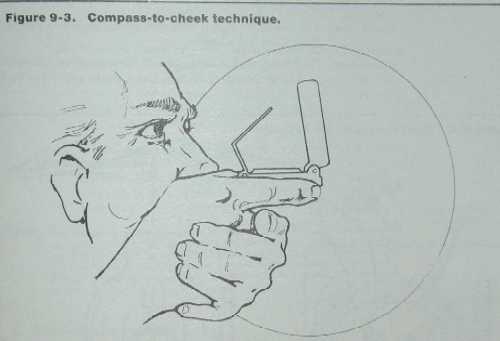
Fold the rear sight slightly forward, put your hand up to your cheek and look through the rear sight slot and align the front hairline the desired object in the distance. Glance down at the dial through the eye lens to read the azimuth.
Presetting The Compass With An Azimuth
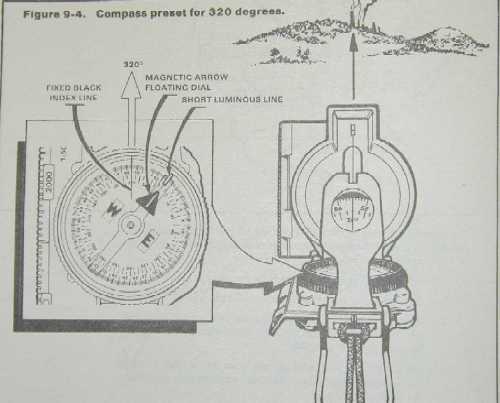
To follow the azimuth, hold the compass in either the centerhold or compass to check position and turn your body until the north-seeking arrow is aligned with the luminous line. Move forward in the direction of the front cover's sighting wire, which should be aligned with the fixed black index line of the preset azimuth.
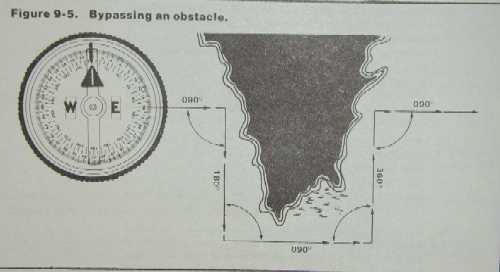
Navigating Around Obstacles
To bypass an obstacle, such as a swamp or large cliff or anything else that will impede your progress toward your goal, and still remain oriented to your course, you can detour around the obstacle by making right angle turns for specified distances.
For example while traveling following an azimuth of 90° you run into a lake. Take a right turn and change your azimuth to a heading of 180° for 100 meters or whatever distance is required to clear the obstacle, then change your azimuth to 90° for a distance, when you are sure you have cleared the obstacle change your azimuth to the back-bearing azimuth of 360° for the same distance that was covered at the first turn. Take another 90° azimuth bearing and you will be back on the original azimuth heading before the detour.
Other Field Expedient Methods Of Navigation When You Have No Compass
When no compass is available you can use different techniques to determine the four cardinal directions.
Step 1. Put a stick or branch in the ground where a distinctive shadow will be cast. Mark the shadow tip with a stone, twig or other method. This direction is always west in direction.
Step 2. After about 10-15 min or so the shadow tip will have moved a few inches, wait until this occurs and then mark the new position of the shadow tip.
Step 3. Draw a line through the 2 marks. This is the approximate East-West line.
Step 4. Stand with the first mark to your left (west) you can now determine the other directions North will be in front of you and South to the rear.
This shadow tip method can also be used to determine the time of day.
If you are at a latitude above 60 degrees in either hemisphere the shadow tip method doesn't work.