This system was developed as an alternative to vacuum packaging and is derived from several methods either currently or no longer available from other sources. All components that need to be purchased are available through industrial supply outlets. Some components can be fabricated using items that most of us have lying around the shop already.
Our system cost under $200 (NOTE ~WW It is assumed that this price would be significantly higher in today's market). This cost was divided between 2 households. Vacuum pumps can get expensive. A hand pump will work fine; all it has to do is remove the air trapped in the bag and contents. We got lucky and found ours at a discounted price. The following itemized list gives each component name, description, our source and vendor part number if applicable:
Vacuum pump, Gast 1531-107B, MSC #80058480. This unit is somewhat expensive new.
Foot switch, Conntrol 862-1330-03, wired with a series plug. Grainger #5A286
Regulator, inert gas, 4000# supply pressure. Local welding supply should have these. These are also standard issue with several brands of wire welders and are "throw-aways" at some welding shops. Do not use a FLOWMETER type of regulator.
Bottle of Nitrogen, the smallest you can get.
12" piece of 1/4" copper tubing
(5) 1/4" NPT x 1/4" hose barbs
20' 1/4" pneumatic hose
(6) small hose clamps
3' 2x4 lumber
3' self stick foam insulation strip
(1) small hinge
(1) small hasp and hook or similar locking device
(1) small 1/4" NPT air muffler
(1) roll of food grade poly bag material. 10" x 4 mil...1500' McMaster Carr 2062T54
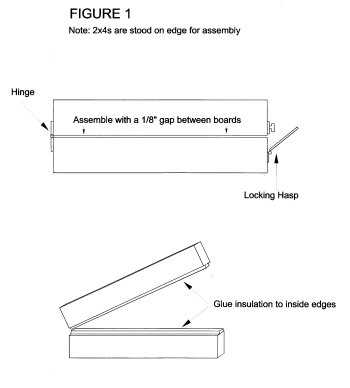
Step One
Using the 2x4 lumber, insulation, hinge and hasp, fabricate the bag holding block per FIGURE 1.
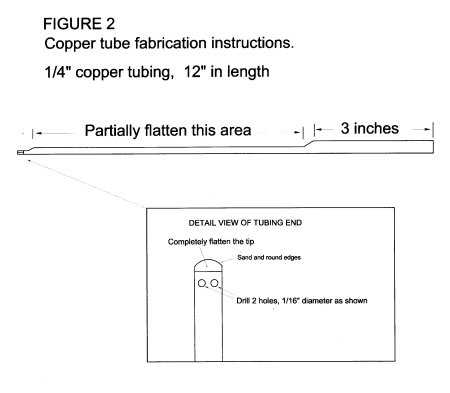
Step Two
Flatten one end of the copper tubing and drill as shown in FIGURE 2.
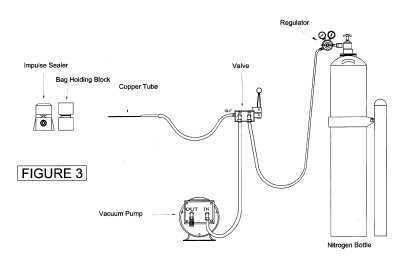
Step Three
Secure the Nitrogen bottle by chaining to a workbench or other solid structure.
Purge a small amount of nitrogen from the bottle by "cracking" the valve open and shutting quickly.
Attach the regulator and turn the adjustment several turns counter clockwise
Plumb the valve to the regulator and vacuum pump as shown in FIGURE 3.
Fasten all hose ends with the hose clamps and check for leaks by slowly opening the valve on the nitrogen bottle and adjusting the regulator output to approximately 10 pounds.
Close the nitrogen bottle valve.
Plug in your footswitch and vacuum pump. Run the vacuum pump and check for leaks.
Your system should now be ready to use.
Step Four
Now that your system is ready it's time to try it out.
Cut a bag approximately 12 inches in length and seal one end with the impulse sealer.
Put items to be stored in the bag leaving approximately 6 inches of the bag material free to be sealed.
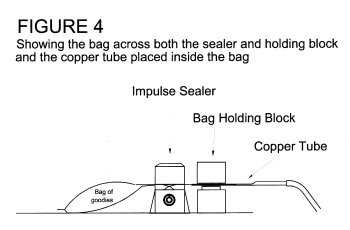
Place the open end of the bag across both the impulse sealer elements and your bag holding block.
Place the copper tube into the open end of the bag, be careful not to place it across the impulse sealing elements, close and lock the bag holding block. See FIGURE 4
Step Five
Turn on the vacuum pump and open your valve to allow the pump to remove the air from the bag.
Shut off the vacuum pump when the bag is compressed and the air is completely removed.
Close the valve.
Do not release the lock on the bag holding block at this time.
Step Six
Open the nitrogen bottle, and adjust the regulator output to approximately 10 psi.
Open the hand valve to allow the nitrogen to enter the bag.
Allow enough nitrogen into the bag to re-inflate it. It is not necessary to over inflate the bag. Over-inflation stresses the seal. It is only necessary to replace the air that WAS in the bag with nitrogen
Close the hand valve and nitrogen bottle.
Seal the bag and open the lock on the bag holding block.
Check the seals with a light squeezing pressure on the bag and listen for leaks.
ADDITIONAL NOTES
For additional "peace of mind" you can seal your nitro-packed bag into another bag.
We use the K sized nitrogen bottle for our system. We have packed enough food for 3 families for a year and still have nearly 4000# of nitrogen in the bottle. A smaller bottle would have been more than adequate.
Always secure a pressurized bottle. I have seen the damage done by one of these when they fall over and get the valves knocked off of them. It's incredible and I would hate to get in the way of one of these "missiles".
This system was comfortably within our budget. We included the footswitch and the hand valve to make things a little easier for one person to package.
The same results could be achieved by eliminating the hand valve and having 2 separate lines vacuuming and pressurizing the storage bag.