
EXPEDIENT SHELTER
By: SteelHarte
Expedient shelter in the woods is a rather simple matter but try my ideas until you get them right. Many will tell you to build a lean to and a nice big fire with a reflector fireplace. Those are nice but not always terribly smart. With this method you can stay warm without a fire at all.
- Selecting the right sticks(Fig 1A, B &C)
By selecting a stick that is like the one on the left, you have picked one that is weak right down the middle. By selecting the one on the right, you have picked one that has it's strength down the middle. It also branches just enough to be used to lock the other two poles together, while allowing the strength down the center for load bearing.. The picture to the right shows a close up of the joint with the three poles locked together.
- Making the initial frame (Fig 2)
Select three sticks that lock together as shown in the picture of the joint. The frame should be long enough to accommodate you in length width and height. Remember when you are setting up the frame, that you will be adding about a foot of leaves beneath you and to the sides as well if it is really cold.
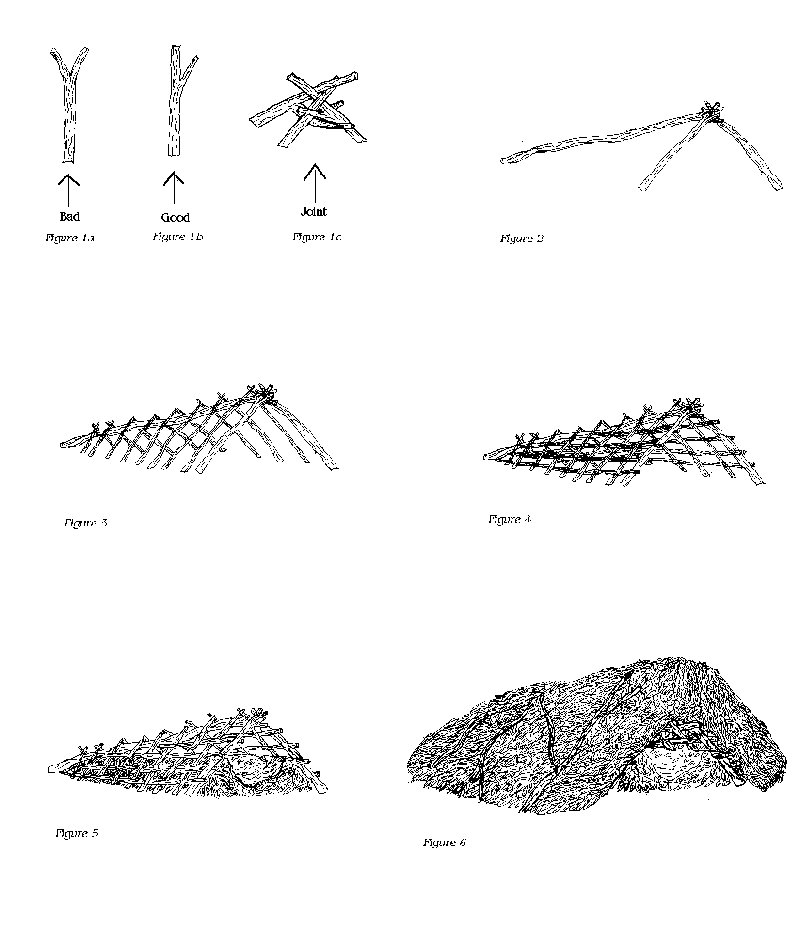
- Placing the uprights in position (Fig 3)
Now take one- to two-inch sticks and lean them against the frame vertically about one foot apart maximum.
- Weaving the horizontals(Fig 4)
Take one half inch to one inch sticks (green and flexible wood is the best) and weave these horizontally in between the vertical sticks, about six inches apart at the most. Before continuing on to the next part it is a really good idea to make sure there are no sticks poking inward. Nothing like waking up to a stick in the eye. I don't know about you but that would sure screw up my day.
- Making the sleeping part the bed, matted leaves etc.(Fig 5)
Take leaves and cover the floor and pack them down several times. By making the bed in several layers you will make it more difficult for water to soak up towards you. As in, there will be separate layers without a vertical connection.
- Covering with leaves(Fig 6)
Now bury the entire thing in several feet of leaves. If you are in piney woods you will need even more as they do not cut the wind at all it seems. I found that out the hard way and came up with my own solution to that problem. Pine straw or leaves several feet thick will shed water quite well too. Now throw a bunch of sticks on top to keep all of the straw or leaf clutter in place in case of wind.
Piney woods create a different situation for this kind of shelter. The straw allows the air to flow pretty freely which doesn't help with insulating at all. I decided to go and see what the animals in the area did to combat the same problems I was encountering. It turns out they are pretty sharp for being food animals. They have been at this for a lot longer than I anyway. A rodent will find a piece of bark to hide under and then shred dry grasses as an insulator, packing them into each nook and cranny they can, to block the wind. We are too big to use a piece of bark so I use a sheet that has been dyed O.D. green. I actually sleep in a camo bag that is just real heavy gauge real tree camo and has bug netting at the opening. I will discuss that bag in a bit.
Anyway, take the bag and lay it out in the tight fitting shelter and then take grass and shred it using heavy leather gloves and twisting and rubbing it together. Put the now fluffy grass on top of the bag and build up a good layer. When you have a good layer of insulation put the sheet on top to block any excessive air flow. I carry two such sheets with me. They don't weigh much or take that much space. When you are ready to go to sleep, grab an arm load of leaves and pull them in plugging the opening at the front. You will be surprised at how warm you can be in one of these.
- Firearms and corrosion-prone items need to have a moisture barrier to protect them
Anything you have that might be corrosion-prone should be protected from humidity. The second you start to warm up, the warm moisture laden air will be drawn to them. It will sit there and merrily go to work on everything you have that can rust as you sleep. So make sure you have taken that into account. This company has products that can help in that area: NoRust Bags (link below)
- In the event there are no sticks or time, you can ...........
If you are in a real hurry and there is no time to build the above shelter, simply bury yourself in leaves using the various layers I have suggested topped off with a layer of plastic or a camo tarp. By various layers I mean, pack some leaves down about a foot thick, lay out the bag, if in piney woods use the grasses trick I mentioned and add the sheets. Put some leaves on top, the tarp or poly, and then cover with some more leaves and some small sticks to keep it all in place. Now climb in and get some sleep.
- Now for that way cool bag I was talking about earlier.
This bag is large enough for myself and one other person, my wife. I used some heavy real tree cloth they happened to have on sale locally. The top of the bag has bug netting at the end. The reason I did the bag in the first place was to keep nature's tax collectors off of me. You know what I mean, ticks, mosquitoes etc. The last thing I want to have to deal with ever, is Lyme disease or any of the many delightful things that are available to us in the woods. By putting a little bit of D. E. E. T. at the opening, they won't like you anyway and will probably stay away.
I haven't done it yet but will soon, but I will be adding some straps on the sheets and the bag so they can be used for hauling the numerous piles of leaves for this type of shelter. By adding these straps I will be able to pile the leaves on the middle and tie it off making the entire thing a leaf bag.
One of the advantages of this type of structure is that it can serve long or short term needs. I have a structure in my front yard that has been there for several years. All I ever need to do is add more pine straw to the top from time to time. This structure is also very easily disassembled and dispersed about the woods leaving no trace you were ever there. Provided you did several things:
- You didn't cut all of the grass in a huge rectangular pattern, which is tantamount to putting out a sign (meaning you got the grass from various areas and pulled the dry stuff out without cutting it).
- When and if you cut the green horizontal twigs you cut them in such a way that it can't be seen. Bury the remaining cut ends in leaves or kill the entire damn plant. I would rather kill the bush than leave a trace. Take the whole thing if required.
- When getting rid of the shelter as in spreading it back out, you don't throw the cut sticks out with everything else. Remember they have cut ends unlike the clutter you used for the rest of the shelter. Bury them deep in clutter where water will get to them and break them down quick.
- One last thing! Since this shelter is pretty well hidden if placed well and the leaf clutter is faired in right, you want to be careful as to where you put it. Let's not set it up in an area where a tank can easily fit.
That would not be a very nice way to wake up for our last time now would it?
NoRust Bags http://norustbags.net
BACK